

Buying the hardware is only 40 percent of the battle when it comes to securing your home’s power supply. While a high-quality standby unit is essential, the technical complexities of a professional home generator installation often catch even the most prepared homeowners off guard. You likely already know that a grid failure is more than an inconvenience; it’s a direct threat to your home’s climate control and food safety. However, the fear of choosing an undersized unit or failing a local permit inspection can make the process feel paralyzing.
We’ve designed this guide to eliminate that uncertainty. You’ll master the technical requirements, precise costs, and the five-step process required to achieve total energy independence. We’ll provide a clear roadmap of the 14-day installation timeline, explain the critical fuel line specifications, and give you the data needed to hire a local professional with complete confidence. From understanding the $3,500 average labor investment to navigating 2026 code compliance, you’ll find the unvarnished facts required to protect your property.
Key Takeaways
- Learn how to calculate your precise wattage requirements to prevent engine strain and nuisance tripping during a power failure.
- Identify the critical safety codes and permitting requirements necessary to protect your home’s insurance status and resale value.
- Master the technical stages of a professional home generator installation, including the vital role of the Automatic Transfer Switch.
- Evaluate the total cost of ownership by distinguishing between high-performance hardware investments and variable local labor expenses.
- Use a specialized vetting checklist to select qualified local professionals who can meet the technical standards your equipment demands.
Pre-Installation Planning: Sizing Your Power Needs
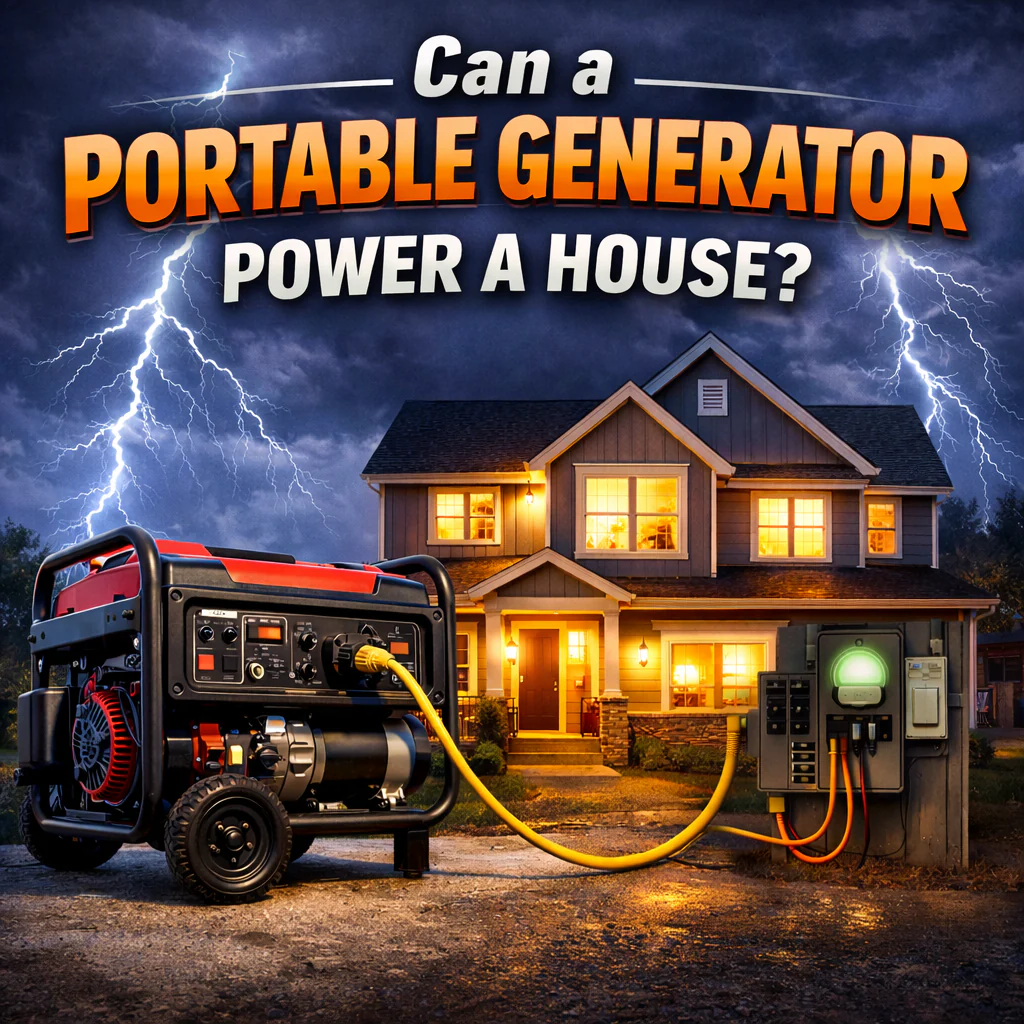
A professional home generator installation is a permanent electrical and mechanical integration into your property’s infrastructure. It isn’t a simple plug-and-play appliance; it connects directly to your home’s breaker panel and fuel supply. Unlike portable units, automatic standby generator systems monitor utility power 24/7 and activate within 10 to 15 seconds of a grid failure. This seamless transition requires meticulous planning to ensure the system handles the sudden load without failure.
Precision in sizing is the most critical step of the pre-installation phase. Undersized units suffer from engine strain and “nuisance tripping,” which occurs when the electrical demand exceeds the generator’s peak capacity, forcing a safety shutdown. You must decide between “Essential Loads” or “Whole-House” coverage. Essential load strategies prioritize 120V circuits like lights, internet routers, and refrigeration. Whole-house coverage supports 240V heavy hitters like clothes dryers and electric ranges. To bridge the gap, we often utilize load shedding modules. These digital controllers temporarily disconnect non-critical high-draw appliances, such as a 5-ton AC unit, to prevent system overload during peak demand.
Calculating Your Total Wattage
You need to distinguish between running (rated) watts and starting (surge) watts. Electric motors require up to 300% more power to start than they do to keep running. For example, a standard refrigerator uses 800W to run but needs 1,200W to start. Other common draws include:
- Well Pumps: 2,500W to 4,000W starting surge.
- Central HVAC: 5,000W to 8,000W depending on tonnage.
- Sump Pumps: 800W to 1,500W.
A Kohler 14kW unit typically handles a 2,000-square-foot home with essential appliances. If your property features multiple AC units or requires 3-phase power for a home workshop, you’ll likely need a 26kW or even a 48kW liquid-cooled model.
Choosing Your Fuel Source: Propane vs. Natural Gas
Your choice of fuel is a critical component of the home generator installation timeline. Natural gas is convenient but provides roughly 10% less BTU energy than Liquid Propane (LP), which can lower the generator’s rated power output. Most residential natural gas meters provide 250,000 BTUs. High-capacity generators often require 400,000 BTUs or more, necessitating a meter upgrade from your utility provider. If you opt for LP, a 500-gallon tank is the industry standard to ensure a 72-hour runtime at a 50% load. This volume accounts for the fact that tanks are only filled to 80% capacity to allow for gas expansion.
Site Selection and Compliance: Meeting Safety Codes
Proper home generator installation begins with a surveyor’s mindset. You aren’t just placing a machine; you’re integrating a high-voltage power plant into your property. Adhering to the National Electrical Code (NEC) Article 445 and NFPA 37 standards ensures the system operates without risking a structure fire or carbon monoxide poisoning. Local building permits are mandatory. Without a signed-off inspection, your homeowner’s insurance may void coverage for electrical fires. An unpermitted installation often reduces property value by 5% to 10% during a title search because it creates a liability for the next owner.
When reviewing the Forbes guide to whole-house generators, you’ll see that unit size dictates the footprint, but safety codes dictate the location. Neighbor relations also hinge on technical specs. Most municipal codes require standby units to stay below 70 dBA at a distance of 23 feet. If your site is too close to a property line, you may need an acoustic enclosure or a different orientation to deflect sound waves. Environmental stability is equally vital. The site must sit above the 100-year flood plain and feature a 2% slope away from the unit to prevent water pooling around the alternator.
Clearance Requirements for Fire Safety
Fire safety hinges on two primary measurements. The 5-foot rule requires the exhaust side to stay 60 inches away from windows, doors, and soffit vents. This prevents lethal carbon monoxide from entering the home through ventilation points. The 18-inch rule specifies the minimum gap between the back of the generator and the exterior wall, though some local codes require 36 inches. You must keep this zone free of mulch, dry brush, or wooden lattice. A clear 36-inch perimeter is also necessary for technicians to perform 100-hour oil changes and valve adjustments safely.
The Foundation: Concrete Pads vs. Pre-Cast Bases
A stable foundation prevents engine vibration from cracking fuel lines or loosening electrical lugs. For a professional home generator installation, you have two main options. A poured-in-place concrete slab, typically 4 inches thick on a 6-inch gravel bed, offers maximum longevity for heavy 22kW to 26kW units. Alternatively, pre-cast composite pads are faster to install and provide sufficient support for smaller air-cooled models. Technical consultants at Generator Vault recommend verifying the soil compaction rate before pouring to ensure the 500-pound unit doesn’t settle unevenly and strain the rigid gas piping.
The Technical Installation Process: Step-by-Step
A successful home generator installation relies on the precise coordination between a licensed electrician and a certified gas fitter. These two professionals must synchronize their schedules to ensure the unit receives adequate fuel volume and safe electrical routing. The Automatic Transfer Switch (ATS) serves as the system’s command center, monitoring utility voltage 24 hours a day. When the ATS detects a drop below 65% of nominal voltage, it signals the generator to start. This hardware also prevents backfeeding, which is the illegal and lethal practice of sending electricity back into the utility grid. According to data from the Electrical Safety Foundation International, backfeeding can energize downed lines miles away, creating a 7,200-volt death trap for utility workers. The ATS ensures a physical break between your home’s power and the outside world.
Step 1: Mounting and Fuel Connection
Technicians secure the generator to a pre-cast concrete or composite pad using 3/8-inch stainless steel bolts to prevent shifting during high-torque engine starts. The plumber then connects the gas line, typically sized at 1 to 1.25 inches depending on the run length to maintain the required BTU load. They must verify the fuel pressure using a manometer; most residential units require a steady 5 to 7 inches of water column (W.C.) for natural gas. Every joint undergoes a soap-bubble test or electronic leak detection to ensure a 100% airtight seal before the system is pressurized.
Step 2: Electrical Integration and the ATS
The electrician mounts the ATS within 2 feet of the main service panel to minimize voltage drop and material costs. They reroute the home’s critical loads, or the entire 200-amp service, through the switch’s mechanical lugs. A dedicated communication link, consisting of low-voltage control wires, is run between the generator’s onboard controller and the ATS. This link handles the “start” signal and monitors the health of the utility feed. It’s the digital handshake that allows the home generator installation to function without human intervention during a storm.
Step 3: System Commissioning and Testing
The final phase involves a “Simulated Power Outage” test. The technician trips the main utility breaker to force the system into action. The generator should start, reach 3,600 RPM, and transfer the load within 10 to 20 seconds. During this run, the technician uses a multimeter to confirm the output is exactly 60Hz and 240V under load. Finally, they program the weekly exercise cycle, a 12-minute self-test that keeps internal seals lubricated and the battery charged. This ensures the machine is ready for a real emergency.
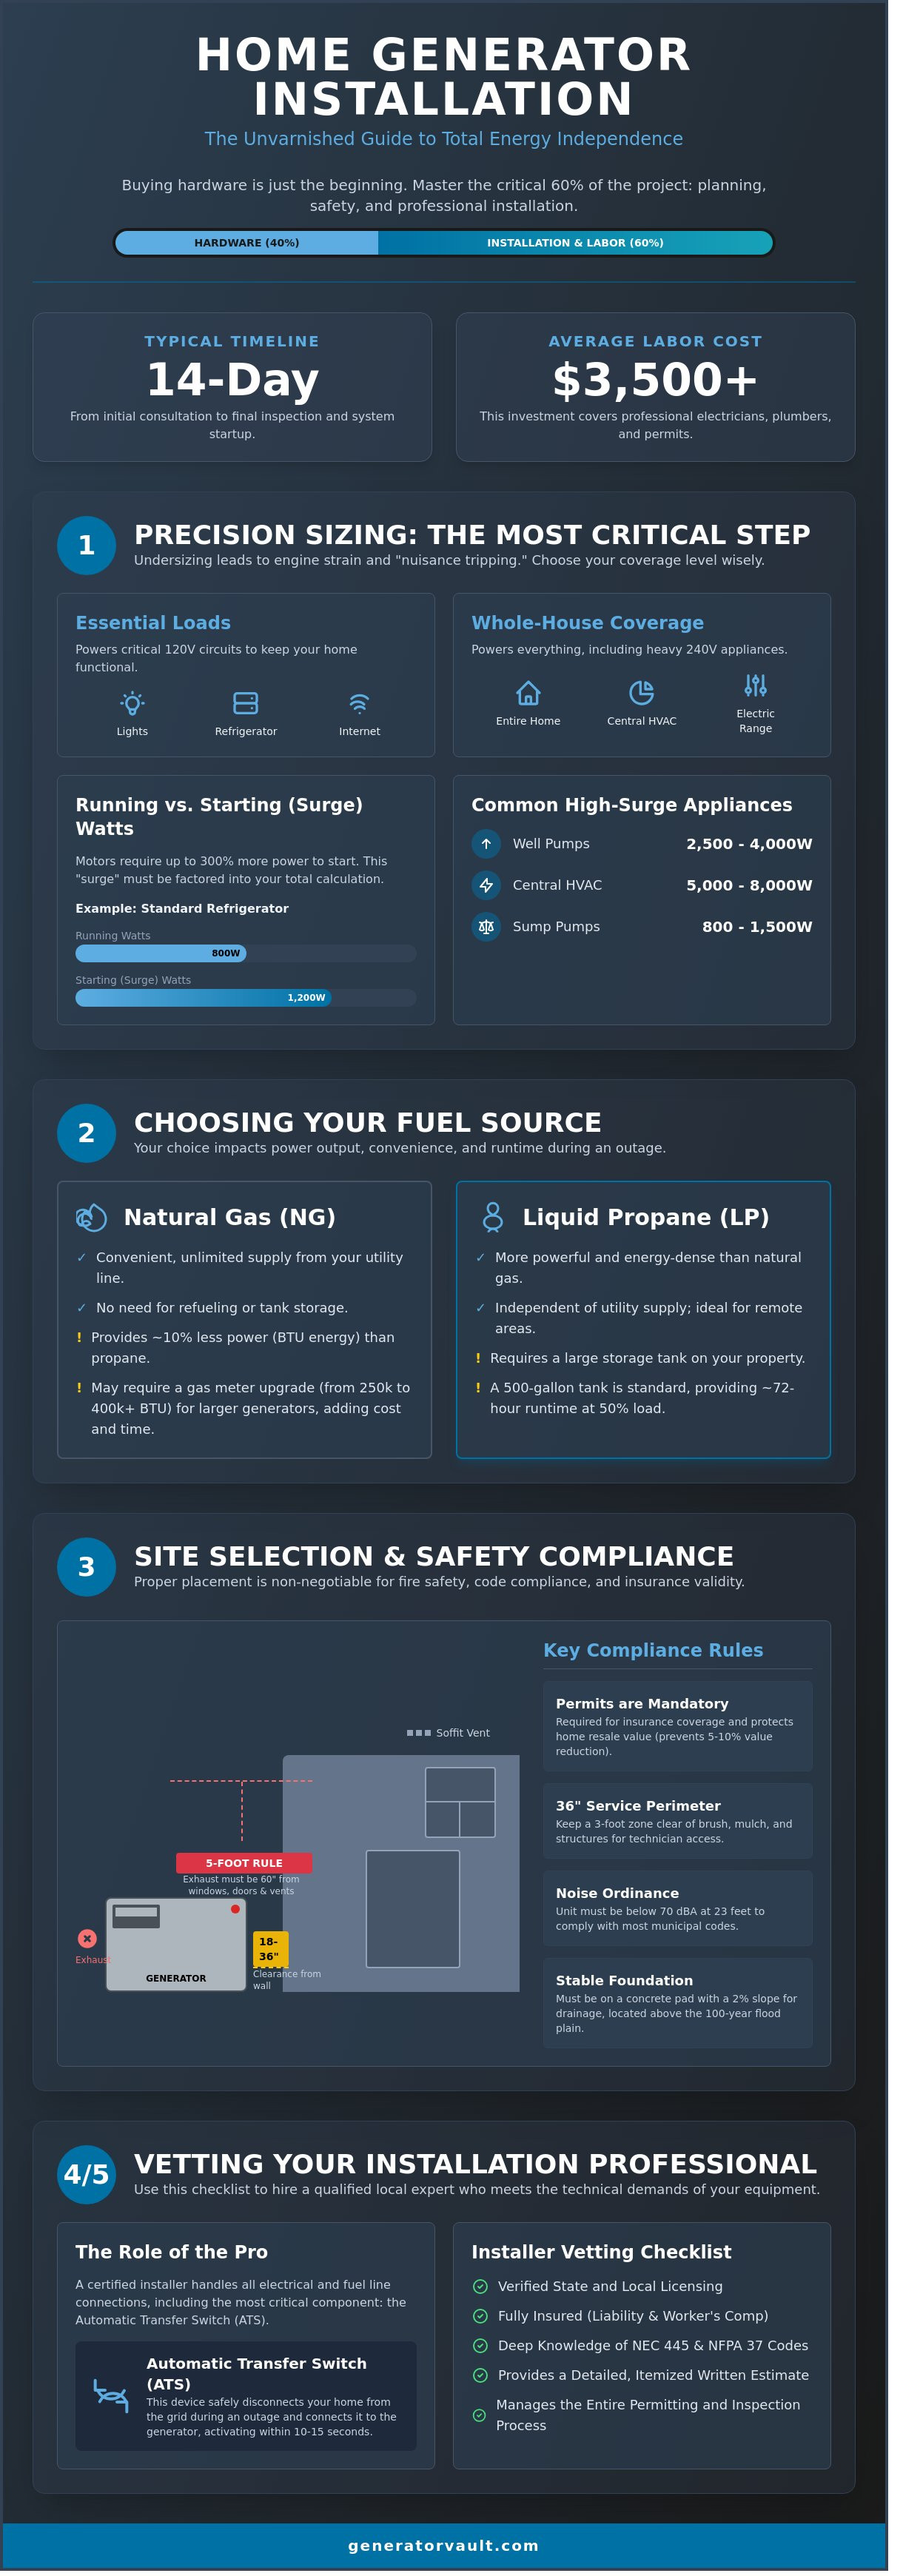
Budgeting for Installation: Hardware vs. Labor Costs
Hardware is only half the story. A successful home generator installation requires a realistic assessment of the Total Cost of Ownership (TCO), which extends far beyond the crate price of the unit. You’ll need to account for site preparation, specialized components, and the technical labor required to ensure the system activates during a utility failure. Most homeowners find that labor and materials comprise 40% to 60% of the final invoice.
Physical distance is the primary variable in labor pricing. If your gas meter and electrical panel are on opposite sides of the house, costs climb quickly. Plumbers charge by the linear foot for gas line extensions, and electricians face similar hurdles with heavy-gauge copper wiring. A 10-foot run is standard, but extending that to 50 feet can add $1,500 to your budget in materials and trenching labor alone.
Your choice of transfer switch also dictates the project’s complexity. Opting for a “Service Entrance Rated” switch often increases the hardware cost by $300 to $500, but it simplifies the wiring. These switches act as the primary disconnect for your home, allowing the generator to manage the entire load without the need for a separate, labor-intensive sub-panel. This technical shortcut often pays for itself by reducing the hours an electrician spends on-site.
Professional home generator installation is a prerequisite for long-term reliability. Manufacturers like Kohler and Generac typically require a certified technician to perform the initial startup and “commissioning” to validate the 5-year or 10-year warranty. Attempting a DIY setup or hiring an uncertified generalist can void these protections, leaving you responsible for expensive inverter or alternator repairs in the future.
Estimated Labor and Material Costs
Electrical labor is the most significant line item, generally ranging from $2,000 to $4,000 for a standard Automatic Transfer Switch (ATS) integration. This includes the wiring of the control logic and the main power leads. Plumbing and gas labor usually adds $1,000 to $2,500, depending on whether you’re tapping into a natural gas line or a propane tank. Don’t forget permit and inspection fees, which typically cost between $200 and $600 depending on your local jurisdiction’s safety codes.
Financing Your Backup Strategy
Managing the upfront investment is easier when you utilize flexible financing options to spread the cost over several years. This is a strategic move when you consider the return on investment. Real estate data from 2024 indicates that a standby generator increases home resale value by 3% to 5%, often recouping over half of the installation cost immediately. When you compare the $12,000 cost of a Kohler 20kW install against the potential $15,000 loss from a week-long outage, including spoiled food, mold remediation from failed sump pumps, and emergency lodging, the hardware pays for itself during the first major storm.
Finalizing Your Project: Choosing the Right Professionals
A successful home generator installation requires a clear division of labor. Generator Vault operates as your high-quality equipment source while you control the local labor costs. This model prevents the 15% to 20% markups often hidden in “turn-key” quotes from local contractors. Sourcing your Kohler or Briggs & Stratton unit directly ensures the technical specifications match your load requirements without paying for a middleman’s inventory carrying costs. It also ensures you own the equipment from day one, giving you full control over the project timeline.
Vetting your installer is the final step in securing your power independence. Use this checklist to verify their credentials:
- Verify “Authorized Dealer” status: This is critical for 5-year or 10-year warranty claims. An unauthorized installer can jeopardize your factory coverage if they fail to register the commissioning date correctly or use non-spec components.
- Check municipal licensing: Standby units require specific permits for both electrical and gas lines. In 2026, many jurisdictions require specific carbon monoxide sensor integration and strict setback distances from windows.
- Confirm load bank testing: Testing the unit at 100% capacity during commissioning is non-negotiable for long-term reliability. Don’t settle for a simple “startup” test.
Questions to Ask Your Electrician
Are you licensed, bonded, and familiar with standby generator control wiring? This specialized low-voltage work differs significantly from standard residential circuits. Will you handle the local permit application and final inspection? This ensures the 2026 code compliance is met without surprise fines. Do you provide a workmanship warranty separate from the Kohler or Briggs manufacturer warranty? You need protection against installation errors, such as improper grounding or gas pipe sizing, for at least 12 months following the home generator installation.
The Generator Vault Advantage
We prioritize logistics and technical accuracy so you don’t have to. Our free shipping and direct technical support simplify the procurement phase for any homeowner. You gain direct access to Kohler and Briggs & Stratton inventory, bypassing the typical 4 to 8 week lead times found at local retail outlets. Secure your unit today and schedule your local pro for a seamless install once the hardware is on-site.
The first 25 hours of operation represent the most critical phase for your engine’s internal components. This initial break-in period requires a full oil and filter change to remove microscopic metal shavings produced as the piston rings seat against the cylinder walls. Failure to perform this service can reduce the engine’s operational lifespan by 30% over a 10-year period. Ensure your installer schedules a follow-up visit or provides a maintenance kit for this 25-hour interval. Proper lubrication management during the first year of ownership is the best insurance against premature failure.
Securing Your Energy Independence for 2026
A successful home generator installation requires precise load calculations to ensure your 22kW or 26kW unit handles peak surge demands during a grid failure. You’ve learned that site selection must strictly adhere to NFPA 37 standards, maintaining a minimum 5-foot clearance from windows and doors to ensure safety. Budgeting for this investment typically involves a 50/50 split between hardware costs and professional electrical labor. By prioritizing these technical specifications and code compliance, you protect your property and your family’s comfort.
Reliability starts with high-performance equipment from names you trust. Shop Kohler and Briggs & Stratton Standby Generators at Generator Vault to find the industry’s most durable power solutions. As an Authorized Dealer, we provide free shipping to the contiguous US and offer flexible financing options to fit your project’s 2026 budget requirements. You’ve done the research and assessed the technical risks; now it’s time to implement a power strategy that stands the test of time. Your home is ready for the next storm.
Frequently Asked Questions
Do I need a permit to install a home standby generator?
Yes, 95% of municipal codes in the US require both electrical and mechanical permits for a home generator installation. You’ll likely pay between $50 and $250 for these approvals depending on your local building department’s 2026 fee schedule. Failure to secure these documents can result in fines or complications with your homeowner’s insurance policy if a fire or electrical fault occurs.
How far should a generator be from the house?
National Fire Protection Association (NFPA) 37 standards require a minimum of 5 feet from windows, doors, and vents to prevent carbon monoxide infiltration. Some manufacturers have models tested for 18 inch clearances from non-combustible walls, but you must check the specific UL 2200 certification for your unit. Proper placement ensures the exhaust doesn’t enter the 2,500 square foot living space during extended runtimes.
Can I install a home standby generator myself?
You shouldn’t attempt a DIY installation because it involves high-voltage electrical work and high-pressure gas line tapping. Standard warranties from major brands like Generac or Cummins are often voided unless a certified technician performs the startup. 70% of installation failures stem from improper gas pipe sizing or incorrect transfer switch wiring, which creates safety hazards for your family and the electrical grid.
How long does a typical home generator installation take?
A standard home generator installation typically takes 4 to 8 hours of active labor once the concrete pad is cured. If you’re running more than 20 feet of gas piping or upgrading a 200-amp electrical panel, the process can extend to 2 full workdays. This timeline includes the final municipal inspection and the initial startup test to verify the system’s total harmonic distortion remains under 5%.
What is an Automatic Transfer Switch (ATS) and do I need one?
An ATS is an intelligent switch that detects a utility power drop and signals the generator to start within 10 to 30 seconds. You need one for a standby system to ensure a seamless transition and to prevent backfeeding the grid. This is a mandatory safety requirement under NEC Article 702 to protect utility workers who are performing line repairs during a local power outage.
Will a 14kW generator run my whole house?
A 14kW unit provides approximately 58 amps at 240V, which can power a 3 ton air conditioner, refrigerator, and LED lighting simultaneously. It won’t support a 3,000 square foot home with multiple electric ovens and water heaters at once. You’ll need to use a power management module to shed non-essential loads, ensuring the voltage remains stable for sensitive electronics like laptops and medical equipment.
What maintenance is required after the installation is complete?
You must change the oil and filter every 100 to 200 run hours or at least once every 12 months. Battery voltage should be tested quarterly, as 80% of start-up failures are caused by dead 12-volt lead-acid batteries. Most owners schedule a professional 25-point inspection annually to ensure the cooling system, fuel lines, and spark plugs are functioning at 100% efficiency before storm season.
Does a home generator increase property value?
Real estate data from 2025 indicates that a permanent standby generator increases a home’s resale value by 3% to 5% on average. In regions prone to hurricanes or grid instability, homeowners often see a 150% return on investment regarding the initial home generator installation cost during a home sale. It’s a tangible asset that 60% of buyers in high-risk zones now list as a top-three priority.

